
")
Whether you are setting up a local home server, troubleshooting a stubborn network connection, or trying to avoid IP conflicts with other devices on your router, knowing how to change your IP address in Windows 11 is an essential tech skill.
By default, your router assigns a “Dynamic” IP address to your computer using a protocol called DHCP. This means your IP address can change from time to time. When you manually change your IP address, you are giving your PC a “Static” IP—a permanent address on your local network that won’t fluctuate.
While there are a few ways to do this (including using the Command Prompt or the legacy Control Panel), the modern Windows 11 Settings app is by far the easiest and most user-friendly method.
How to Set a Static IP via the Settings App
Before you begin, make sure you know your router’s gateway address (usually 192.168.1.1 or 10.0.0.1) and have an available IP address in mind that isn’t already being used by another device (like your phone or smart TV).
1.Open the Settings App:
Press the Windows Key + I on your keyboard to instantly open the Settings application. Alternatively, you can click the Start button and select the gear icon.
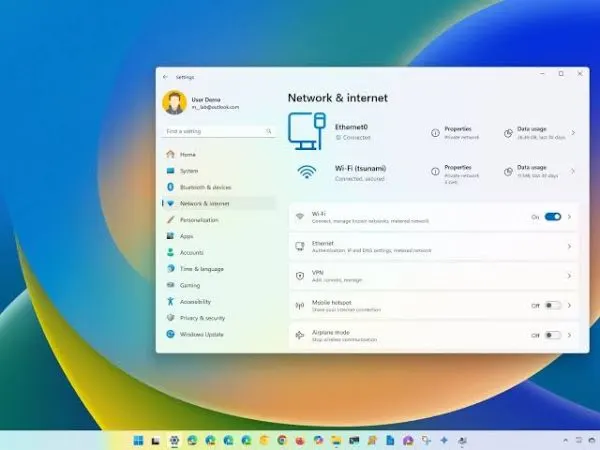
2.Navigate to Network Settings:
In the left-hand sidebar, click on Network & internet. This will display your current active connections.
Select Your Connection Type
Choose either Wi-Fi or Ethernet
3.Select Your Connection Type:Choose either Wi-Fi or Ethernet.
Depending on how your computer is connected to the router, click on Wi-Fi (then click your network properties) or click directly on Ethernet if you are hardwired.
4.Edit the IP Assignment:
Scroll down until you see the IP assignment section. By default, it will say “Automatic (DHCP)”. Click the Edit button next to it.
5.Switch to Manual Configuration:
A drop-down menu will appear. Change the setting from “Automatic (DHCP)” to Manual. Next, toggle on the IPv4 switch.
6.Enter Your New IP Details: Double-check these numbers to avoid disconnecting yourself.
Fill in the following fields:
- IP address: The new static address you want (e.g.,
192.168.1.50). - Subnet mask: Usually
255.255.255.0for home networks. - Gateway: Your router’s IP address (e.g.,
192.168.1.1). - Preferred DNS: You can use your router’s IP again, or a public DNS like Google’s (
8.8.8.8) or Cloudflare’s (1.1.1.1).
7.Save and Apply:
Click the Save button at the bottom of the window. Your network connection might briefly drop and reconnect as Windows applies the new static IP address.
also read : – How To Use Google Voice Accounts For Your Business?
Why Use a Static IP Address?
If you are just browsing the web and checking emails, you don’t need to change your IP address—DHCP works perfectly fine. However, setting a manual IP is highly recommended if you:
- Host a local server: Such as a Plex media server or a Minecraft server. A static IP ensures your other devices can always find the server at the exact same address.
- Forward ports on your router: Port forwarding rules are tied to specific IP addresses. If your PC’s IP changes, your port forwarding rules will break.
- Share printers or files: Network drives and shared printers map much more reliably when the host machine has a fixed IP.
Pro Tip: When choosing your manual IP address, pick a number outside of your router’s normal DHCP distribution range to avoid assigning an address that another device might try to claim later.
Frequently Asked Questions (FAQ)
How do I find my current IP address and router gateway in Windows 11?
The quickest way is to open the Command Prompt (type
cmdin the Start menu search) and typeipconfig, then press Enter. Look for “IPv4 Address” for your computer’s current IP, and “Default Gateway” for your router’s IP address.Why did I lose internet access after changing my IP address?
This usually happens if the Subnet mask or Gateway address was entered incorrectly, or if you picked an IP address that another device on your network is already using (an IP conflict). To get back online, go back to the IP assignment settings and switch it back to “Automatic (DHCP)”.
What is the difference between a static IP and a dynamic IP?
A dynamic IP is temporarily assigned by your router and can change after a PC reboot or power outage. A static IP is manually assigned by you and never changes, which is ideal for hosting local servers, sharing network drives, or setting up port forwarding.
Should I change my IPv4 or IPv6 address?
For almost all home networking tasks—like setting up a local server, mapping a network drive, or port forwarding—you should edit the IPv4 settings. IPv6 is the newer standard but is rarely necessary to configure manually on a standard home network.
Can I change my public IP address using this method?
No. Changing your IP address in Windows 11 only changes your local (private) IP address on your home router. To change your public IP address (the one websites see), you need to use a VPN, proxy, or contact your Internet Service Provider (ISP).